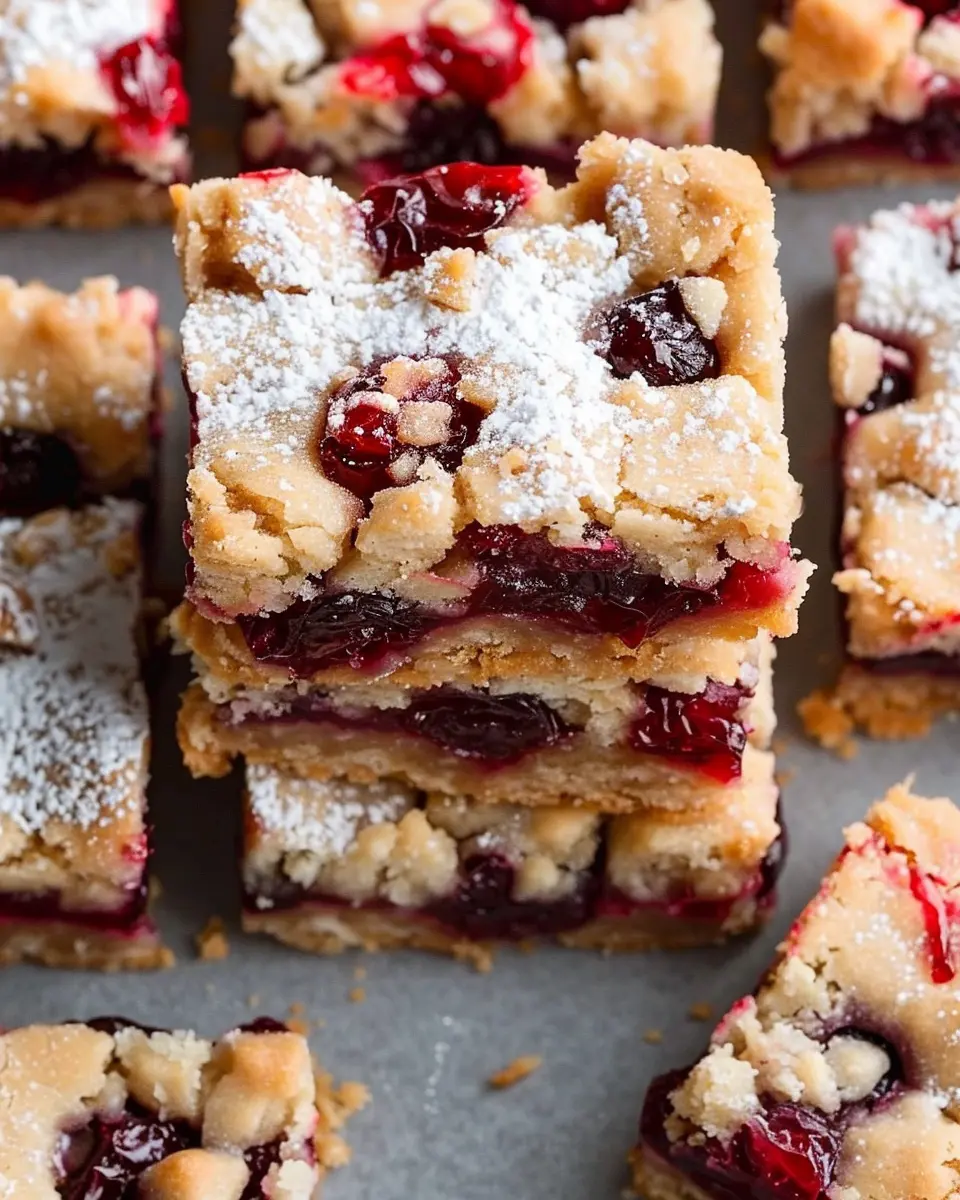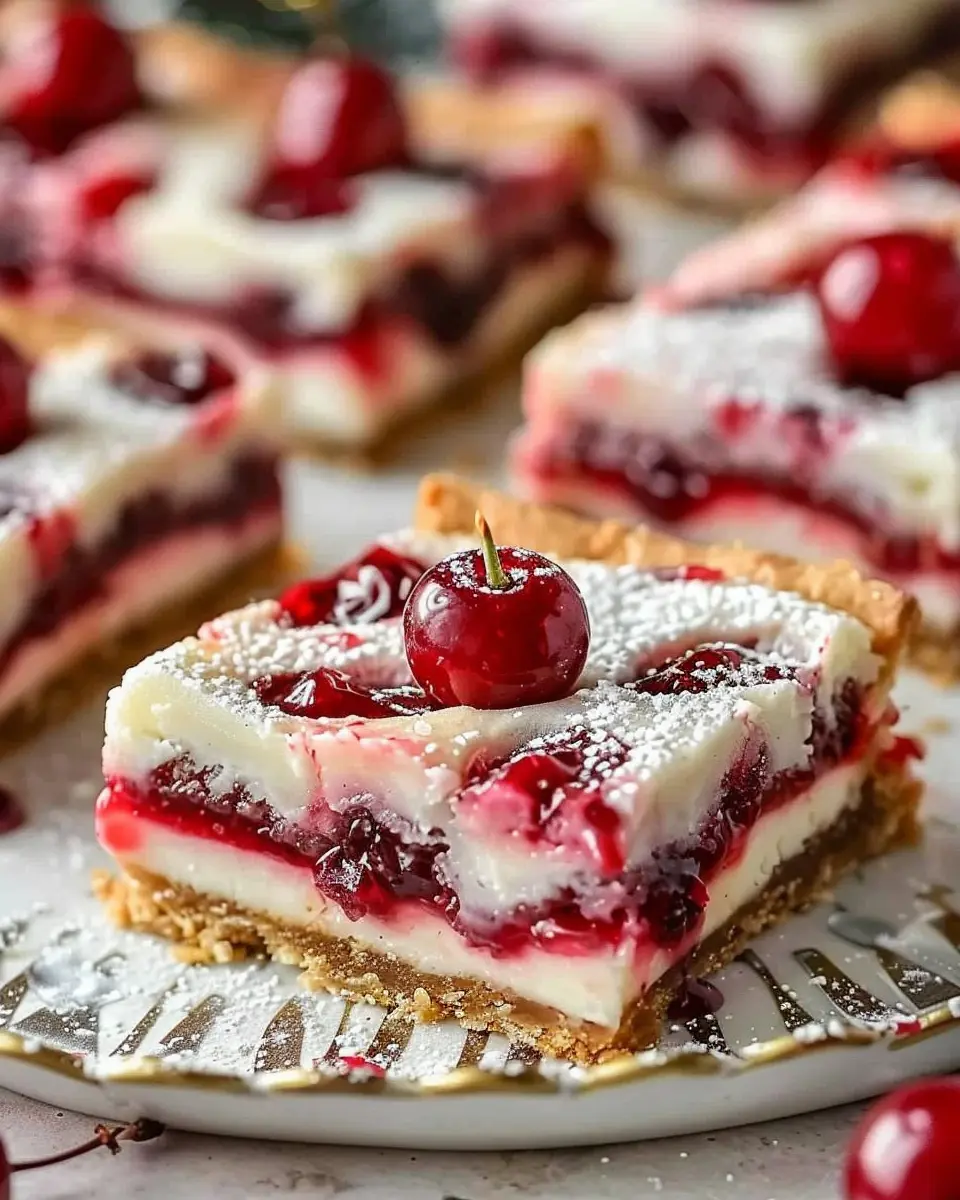
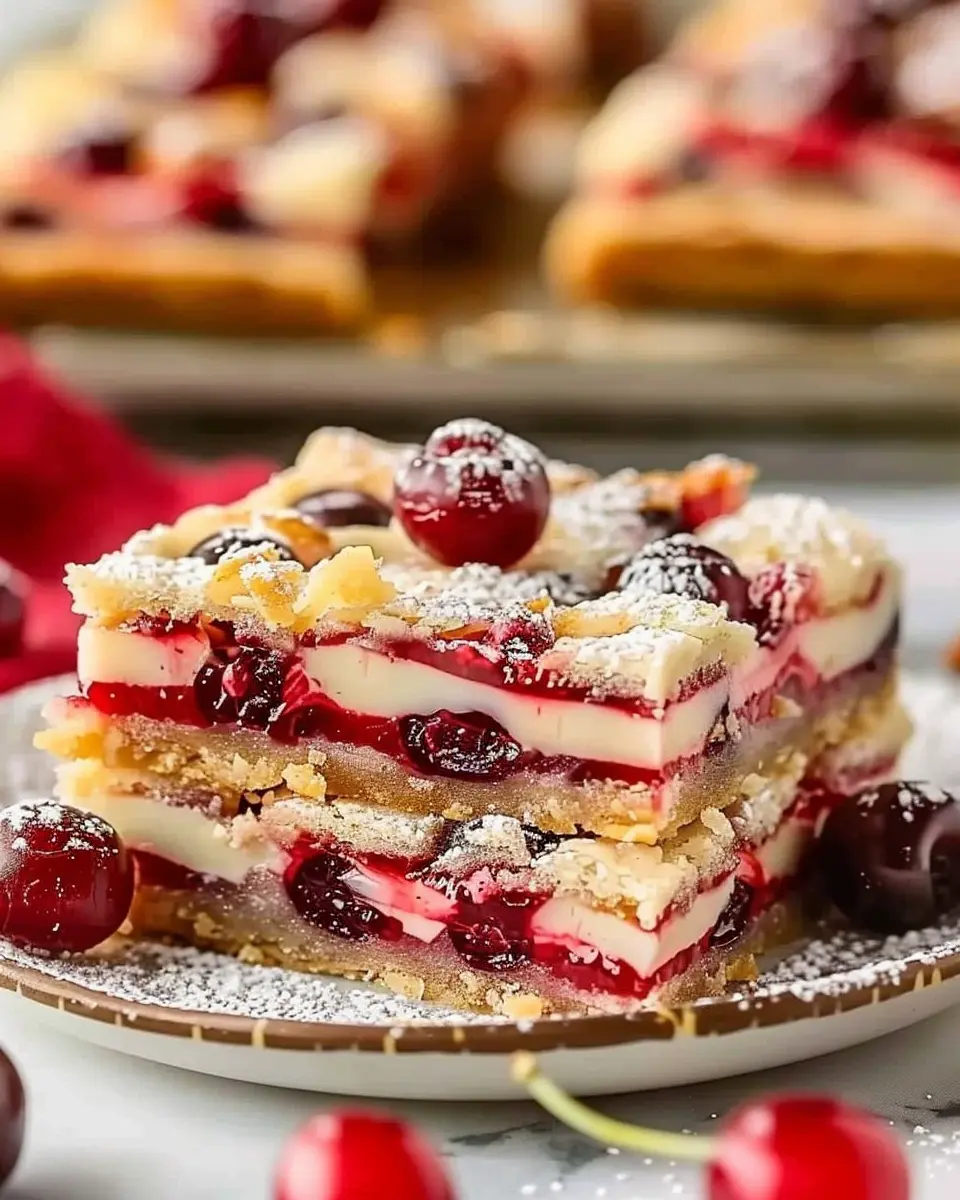
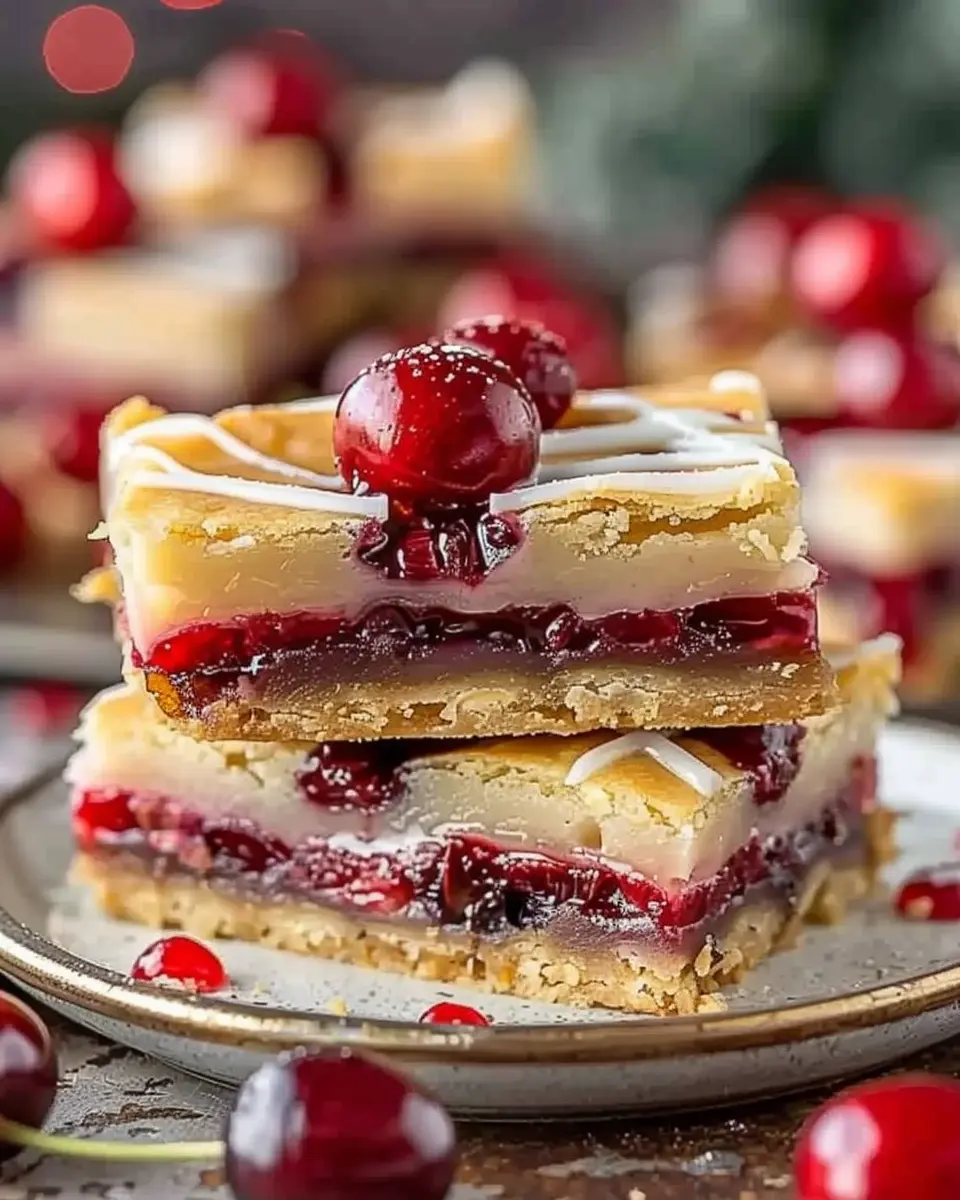
Introduction to Christmas Cherry Bars
The holiday magic in a bar
When the air grows crisp and the scent of pine fills your home, it’s time to embrace the magic of the season—and nothing captures that spirit quite like Christmas Cherry Bars. These delightful treats blend the sweetness of cherries with a buttery crust, creating a dessert that’s as festive as it is delicious. Imagine serving a platter of these colorful bars at your holiday gatherings, watching your friends and family light up with joy.
Why Christmas Cherry Bars?
So, why choose Christmas Cherry Bars for your upcoming celebrations? For starters, they are unbelievably simple to make yet yield fabulous results. Perfect for novice bakers, these bars don’t require the finesse of traditional pie-making, allowing you to focus on what truly matters: building memories with loved ones. Plus, they’re an excellent make-ahead dessert, freeing up your precious time on the big day.
But let’s be real—who hasn’t found themselves searching for festive desserts that can cater to varied tastes? Christmas Cherry Bars offer a pop of color and flavor that can easily be paired with other holiday favorites, whether you are serving them alongside traditional Turkey Bacon quiches or a vibrant salad. Plus, they cater separately to both cherry lovers and those more inclined toward straightforward desserts.
A nostalgic twist on a classic dessert
These bars aren’t just a new addition to your holiday baking; they bring back a nostalgic twist that many will recognize from their childhood kitchens. Growing up, I fondly remember my grandmother whipping up a batch every December. The blend of tart cherries and a soft, crumbly base can transport you back to cozy family gatherings, even in the busiest of times.
And here’s a fun tip: feel free to customize your bars! Use fresh cherries in season or even opt for cherry preserves if you’re short on time. For a festive touch, sprinkle some powdered sugar on top right before serving.
Explore this delightful recipe, and you might just find Christmas Cherry Bars becoming a new cherished tradition in your holiday festivities. Happy baking!
Ingredients for Christmas Cherry Bars
Essential ingredients you’ll need
Creating delicious Christmas Cherry Bars starts with gathering the right ingredients. Here’s what you need to bring that festive flavor to life:
- Fresh or jarred cherries: Use pitted cherries for the best texture and flavor.
- All-purpose flour: This is the backbone of the bars, offering the ideal consistency.
- Granulated sugar: For sweetness, balancing out the tartness of the cherries.
- Butter: Unsalted works best for controlling the saltiness in your bars.
- Eggs: They add moisture and help bind everything together.
- Baking powder: This leavening agent gives the bars their delightful lift.
- Almond extract: A splash elevates the cherry flavor and adds a warm scent.
Optional add-ins for a custom touch
Looking to personalize your Christmas Cherry Bars? Consider these fun add-ins:
- Chopped nuts: Walnuts or pecans can add a delightful crunch.
- White chocolate chips: A sweet contrast that pairs beautifully with cherries.
- Coconut flakes: For a tropical twist that makes your bars feel even more festive.
Feel free to adjust and play around with these ingredients! And remember, the best recipes are often the ones that reflect your unique style. If you want to dive deeper into baking techniques, check out this resource for expert tips.
Step-by-step preparation for Christmas Cherry Bars
When the holiday season rolls around, there’s nothing quite like baking that fills your home with warm, sweet aromas. One delightful treat that will surely become a staple in your festive lineup is Christmas Cherry Bars. With a perfect blend of tangy cherries and a buttery crust, they are as delicious as they are visually stunning. Let’s dive into the step-by-step preparation to make this festive treat!
Gather your ingredients
First things first, you need to ensure you have everything on hand before you begin baking. Here’s what you will need for your Christmas Cherry Bars:
-
For the crust:
-
1 cup of all-purpose flour
-
1/2 cup of sugar
-
1/2 cup of unsalted butter (softened)
-
1 egg
-
1/2 teaspoon of vanilla extract
-
1/4 teaspoon of salt
-
For the filling:
-
2 cups of cherry pie filling (look for a quality brand)
-
1 tablespoon of cornstarch (to thicken)
-
1 teaspoon of almond extract (optional, but adds great flavor)
-
For the topping:
-
1/2 cup of powdered sugar
-
1 tablespoon of milk (or a milk alternative)
-
Sprinkles (for that festive touch)
Getting quality ingredients can significantly enhance the taste of your Christmas Cherry Bars. Brands like Check out King Arthur Baking or Bob’s Red Mill often provide excellent options for flour and sugar.
Prepare the base
Once you’ve gathered your ingredients, it’s time to whip up the crust. Start by preheating your oven to 350°F (175°C). In a mixing bowl, beat together the softened butter and sugar until the mixture becomes light and fluffy. This is a crucial step! The air incorporated will create a tender and delicious base for your Christmas Cherry Bars.
Next, mix in the egg and vanilla extract, and continue to blend until well combined. In a separate bowl, whisk together your flour and salt, then gradually add this dry mixture into the wet ingredients. You’ll want a nice dough that is slightly sticky but not overly so.
Mix the filling
While your base is chilling out in the fridge for about 30 minutes, let’s get started on the cherry filling. In a bowl, pour in the cherry pie filling, then add the cornstarch and almond extract if you’re using it. Stir gently until all the cherries are well coated. The cornstarch helps thicken the filling, ensuring your bars don’t end up too runny!
Layer it up
Now it’s time to put everything together to create your delicious Christmas Cherry Bars. Take your chilled dough and press it into a greased 9×9-inch baking pan, making sure to cover the bottom evenly. You can leave a bit of dough aside for crumbling on top as a delightful garnish later.
Next, pour the cherry filling over your crust and spread it evenly, ensuring every bite is filled with that lovely cherry flavor. If you saved some dough, sprinkle the reserved crumbles over the cherry filling for that perfect textured topping.
Bake to perfection
Pop your Christmas Cherry Bars in the preheated oven and bake for about 30–35 minutes, or until the top is lightly golden. During this time, your home will begin to smell absolutely magical, and you may find it hard to resist peeking in every few minutes!
Cool and cut
Once baked, remove the bars from the oven and let them cool completely in the pan. This is important; if you cut them too early, they might crumble. Once they’re set, cut them into squares or rectangles, and drizzle with a simple icing made of powdered sugar and milk for that extra festive flair! If you’re feeling particularly celebratory, top them with colorful sprinkles.
And there you have it—your very own Christmas Cherry Bars! Perfect for holiday gatherings or simply to enjoy during a quiet evening at home with loved ones. Happy baking!
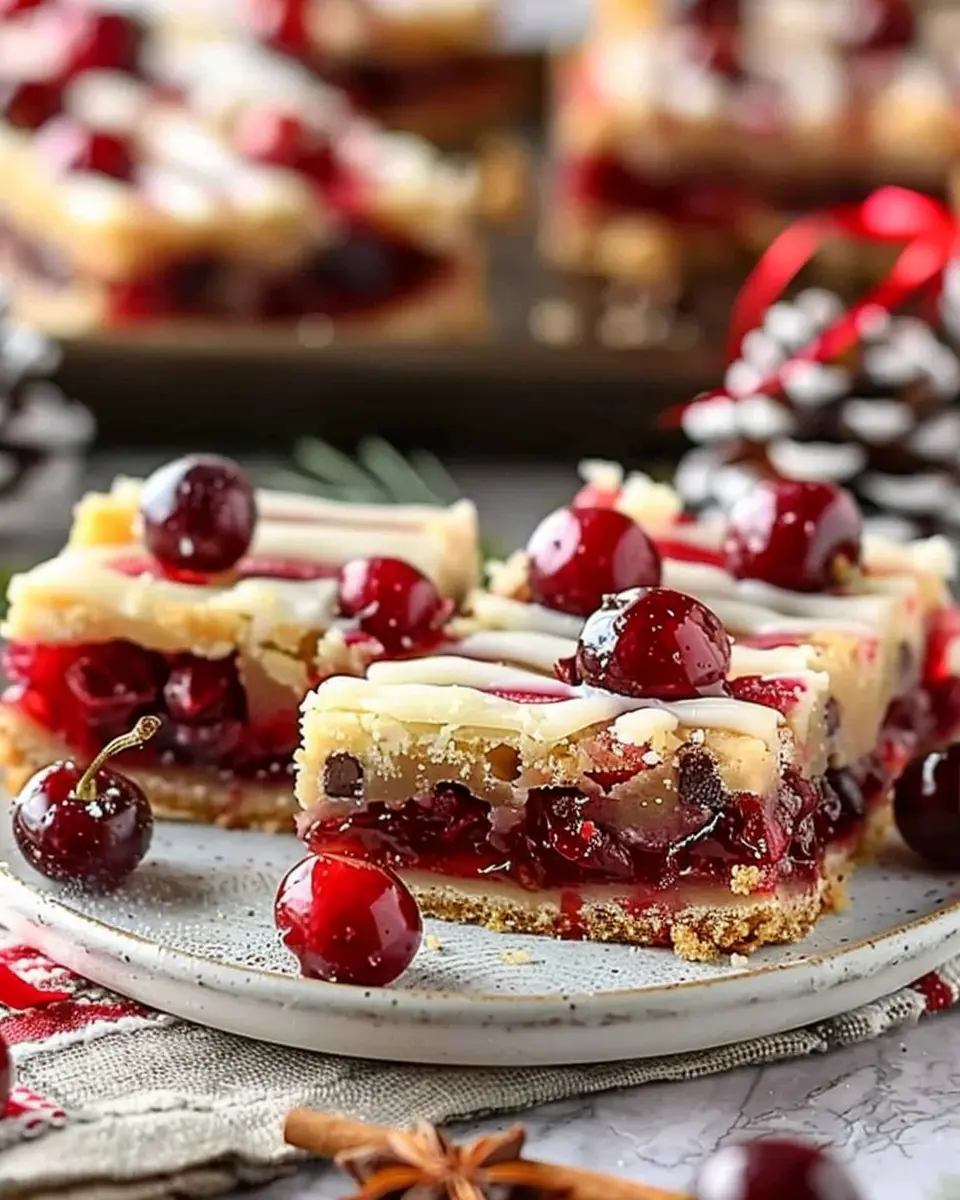
Variations on Christmas Cherry Bars
When it comes to Christmas Cherry Bars, there’s plenty of room for creativity. Whether you’re looking to add a twist or simply use what you have on hand, these variations are sure to delight your holiday gatherings.
Festive Nutty Additions
Why not enhance your Christmas Cherry Bars with some nutty goodness? Incorporate chopped nuts like pecans or walnuts for a delightful crunch. Toasting the nuts before adding them can really elevate their flavor, giving your bars an extra layer of richness. Not only do they taste amazing, but they also improve the texture—perfect for satisfying those holiday snack cravings.
Swapping Cherries for Cranberries
Feeling adventurous? Try swapping the cherries for cranberries! Dried cranberries will lend a tangy sweetness that’s perfect for the festive season. If you want to stay true to the cherries, consider a half-and-half approach: use both cherries and cranberries. This not only diversifies the flavor but also offers a vibrant visual appeal—ideal for impressing guests. Check out this resource on the health benefits of cranberries for some inspiring ideas.
Toppings to Elevate Your Bars
Don’t underestimate the power of toppings! A light glaze made of powdered sugar and milk can add a sweet finish to your Christmas Cherry Bars, while shredded coconut or a sprinkle of cinnamon can create a warm, inviting aroma. For a touch of decadent indulgence, consider drizzling some melted chocolate over the top. This adds a beautifully contrasting flavor that pairs wonderfully with cherries.
By experimenting with these variations, you can personalize your Christmas Cherry Bars to fit any festive occasion. So roll up your sleeves and start creating your unique holiday treats!
Cooking Tips and Notes for Christmas Cherry Bars
Importance of Chilled Butter
Using chilled butter in your Christmas Cherry Bars is crucial for achieving that perfect, flaky texture. Cold butter integrates into the flour more effectively, creating a tender base with delightful layers. Make sure to cut your butter into small cubes and place it back in the fridge for a few minutes if it gets too warm while prepping.
Cooling Times for the Best Texture
Letting your bars cool completely is key to their texture. If you cut into them too soon, they might crumble. Allow them to sit at room temperature for at least 30 minutes. For an even better result, refrigerate them for a few hours before slicing. This extra time helps the flavors meld together beautifully and makes them easier to cut.
Storage for Freshness
To keep your Christmas Cherry Bars fresh, store them in an airtight container at room temperature for up to five days. If you need to keep them longer, consider freezing them! Wrap each bar tightly in plastic wrap, then in aluminum foil, and they’ll last for about three months in the freezer. For best results, let them thaw at room temperature when you’re ready to enjoy them again.
For more helpful tips on baking and dessert storage, check out this guide.
Serving suggestions for Christmas Cherry Bars
Perfect pairings for coffee and tea
When you’re enjoying your delicious Christmas Cherry Bars, think about pairing them with a warm cup of coffee or tea. The tartness of the cherries complements the rich flavors of a dark roast coffee beautifully. For a lighter option, how about serving them with a delicate Earl Grey tea? The citrus notes in the tea enhance the fruity cherry taste.
If you want to kick things up a notch, consider adding a sprinkle of powdered sugar or a dollop of whipped cream on top of your bars. This simple touch will elevate your dessert table and impress your guests!
Creative ways to present your bars
Presentation matters, especially during the festive season! Arrange your Christmas Cherry Bars on a decorative platter lined with parchment paper for an elegant touch. You can also cut them into festive shapes using cookie cutters.
Don’t forget about garnishes! A sprinkle of fresh mint or even some edible gold flakes can add that extra flair. For an added personal touch, label each dessert with festive tags to share your recipe’s story.
For further inspiration on festive dessert displays, you might check out The Spruce Eats, which offers some great presentation tips for holiday treats. Enjoy serving your Christmas Cherry Bars in style!
Time breakdown for Christmas Cherry Bars
When planning your holiday baking, it’s crucial to know how long your Christmas Cherry Bars will take from start to finish. Here’s a quick breakdown to help you manage your time effectively.
Preparation time
Getting ready to create your Christmas Cherry Bars takes about 15-20 minutes. You’ll need to gather your ingredients, grease your baking pan, and mix those delightfully festive flavors together.
Baking time
The actual baking process will take around 25-30 minutes. Keep a close eye on them as they bake; the sweet aroma will be hard to resist!
Cooling time
After baking, let your bars cool for about 30 minutes. This step is essential, as it allows the bars to set perfectly and makes for easier slicing.
Total time
In total, you’re looking at about 1 hour and 15 minutes from start to finish. With this breakdown, you can easily fit these delightful treats into your holiday schedule! For more festive recipes, check out popular cooking blogs or platforms like Epicurious to inspire your holiday menu!
Nutritional Facts for Christmas Cherry Bars
Calories per Bar
When indulging in these delightful Christmas Cherry Bars, it’s helpful to know what you’re enjoying in each bite. On average, each bar contains about 150 calories. This makes them a sweet treat perfect for holiday snacking without derailing your health goals.
Key Nutrients
These Christmas Cherry Bars not only satisfy your sweet tooth, but they also offer some essential nutrients, including:
- Fiber: Helps with digestion and keeps you full longer.
- Vitamin C: Important for boosting your immune system, especially during the colder months.
- Antioxidants: Cherries are rich in antioxidants, which support overall health.
If you’re curious about the benefits of cherries, consult sources like the Medical News Today for more insights. Balancing holiday treats with nutritious choices is key to enjoying the season without regret. So go ahead and enjoy those bars—they’re a delicious way to celebrate!
FAQs about Christmas Cherry Bars
How can I make these bars healthier?
If you’re looking to lighten up your Christmas Cherry Bars, there are several easy swaps you can make without sacrificing flavor. Consider using:
- Whole wheat flour instead of all-purpose flour for added fiber.
- Natural sweeteners like honey or maple syrup in place of refined sugar.
- Greek yogurt as a replacement for some of the butter or oil; it keeps the texture creamy while reducing calories.
Trying these alternatives can make your festive treat not just delicious but also a bit more nutritious—perfect for those new year resolutions just around the corner!
Can I make them ahead of time?
Absolutely! One of the best things about Christmas Cherry Bars is that they actually taste better after a day or two. Feel free to bake them a day or two in advance; just ensure they cool completely before storing in an airtight container. If you prefer them fresh, you can also freeze them after baking. Simply cut them into bars, wrap each one tightly in plastic wrap, and store in the freezer for up to three months.
What’s the best way to store Christmas Cherry Bars?
To keep your Christmas Cherry Bars fresh, store them in an airtight container at room temperature for up to a week. If you’re worried about them getting stale, popping them in the fridge extends their life for a few extra days. For added convenience, you can even layer parchment paper between bars so they don’t stick together—easy access for snacking!
For additional tips on preserving baked goods, consider checking out sources like the USDA’s Food Safety Guidelines for food storage best practices. Enjoy your baking!
Conclusion on Christmas Cherry Bars
Recap of why they’re a must-bake
These Christmas Cherry Bars are not just another dessert; they encapsulate the joy and warmth of the holiday season. With their vibrant red cherries and buttery crust, they’re the perfect blend of sweet and tart. Not to mention, they’re easy to prepare and make for a delightful addition to any festive gathering. Imagine serving these beauties at your next holiday party or sharing them with family—what a treat!
Encouragement to try the recipe this holiday season
If you’re looking to impress friends and family this holiday season, look no further. Try this Christmas Cherry Bars recipe and watch it disappear faster than you can say “holiday cheer.” Baking is meant to be fun, and these bars are a wonderful way to channel your creativity in the kitchen. So grab your apron, preheat that oven, and make this delightful dessert a new holiday tradition! For more ideas, check out this resource on easy holiday baking tips.
PrintChristmas Cherry Bars: Easy Recipe for a Joyful Holiday Treat
Delight in the festive flavors of these Christmas Cherry Bars, a perfect treat for the holiday season.
- Prep Time: 15 minutes
- Cook Time: 30 minutes
- Total Time: 45 minutes
- Yield: 16 servings
- Category: Dessert
- Method: Baking
- Cuisine: American
- Diet: Vegetarian
Ingredients
- 1 cup cherry pie filling
- 1 cup all-purpose flour
- 1/2 cup granulated sugar
- 1/2 cup butter, softened
- 1 large egg
- 1 teaspoon vanilla extract
- 1/2 teaspoon baking powder
- 1/4 teaspoon salt
- 1/2 cup chopped walnuts
Instructions
- Preheat the oven to 350°F (175°C).
- In a mixing bowl, cream together the butter and sugar until light and fluffy.
- Add in the egg and vanilla extract, mixing well.
- In another bowl, combine the flour, baking powder, and salt.
- Gradually add the dry ingredients to the wet mixture, blending until fully combined.
- Fold in the cherry pie filling and chopped walnuts.
- Spread the batter into a greased baking pan and bake for 25-30 minutes.
- Let cool before cutting into bars.
Notes
- For a festive touch, sprinkle powdered sugar on top before serving.
- Store in an airtight container for up to one week.
Nutrition
- Serving Size: 1 bar
- Calories: 180
- Sugar: 12g
- Sodium: 50mg
- Fat: 8g
- Saturated Fat: 5g
- Unsaturated Fat: 2g
- Trans Fat: 0g
- Carbohydrates: 25g
- Fiber: 1g
- Protein: 2g
- Cholesterol: 30mg